E0053 | 2 Methods: Simple Plant Propagation

Podcast: Play in new window | Download
Subscribe: iTunes | Android | RSS
 Today I’m addressing a question on propagating willows from cuttings. And since it may be easier for some people to understand all the steps easier through video, head over to my Patreon page to sign up and see a video with all the details on these methods. Much of the same info is applicable to tons of other types of plants as well. I’ll film that video this weekend and upload it next week! So go to patreon.com/homegrownliberty if you would like to see my video on how to do this!
One of the listeners has had some trouble getting black willow to root so I’ve been asked to chime in with how I would go about it!
I’ll give you two quick and easy methods you can try and then talk about the details of each.
Method #1: Stick as many cuttings as you’d like in some moist potting soil and wrap that container up in a white plastic trash bag, tie the top, and leave it in dappled shade for a couple months.
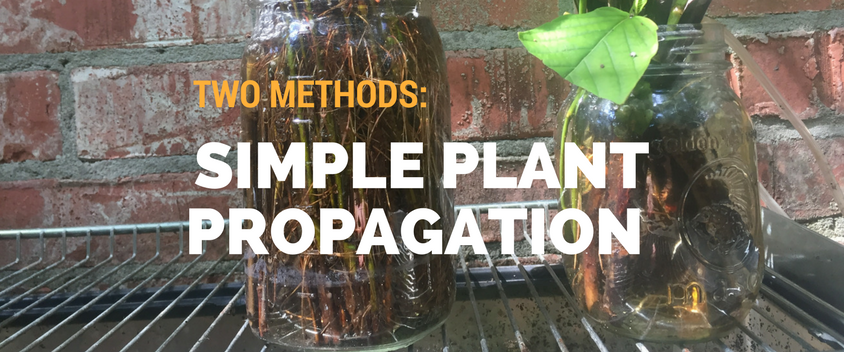
Method #2: Put all the cuttings in some water in a quart jar with an aquarium air pump blowing bubbles in the bottom of the jar.
Those are my quick answers, now here’s the details on how to take and prep the cuttings, followed by specific details on each method to make sure you have success.
To take the cuttings, get a sharp pair of pruning shears and a bucket of water or a jar if you prefer. Cut as much of the newest growth that is close to pencil diameter, no smaller than pencil lead. The smallest stuff won’t have enough embodied energy to root, the larger stems will have cells too stuck in their current role to differentiate and turn into root forming cells. So it’s best to take more young material.
To prep the cuttings, make sure all the cuttings are kept with the tip of the branch pointing up and the base of the branch pointing down. The technical term for the tip is the apical end, and the part that is closest to the roots is called the basal end. So it’s good practice to just make sure you always have the cuttings oriented correctly with the apical tip always up. Then strip all the leaves off, willows root quickly enough that you won’t need leaves, if you really want to, you can leave 1 or 2 leaves on each cutting but that likely won’t be needed. Keep the cuttings in water from the moment you take each cutting until it’s time to stick them in the rooting medium. It’s important to keep them wet or they’ll die.
For method 1, I’d go with a 3 gallon pot filled with a good loose potting mix like pro-mix, but any potting mix should work just fine. You can also use a white 5 gal bucket with holes drilled in the bottom for drainage. You’ll want a minimum of 8” of potting mix to make sure you maintain good moisture levels and so there’s enough of the wood in soil to root well.
Willows will root all along the whole stem of the cutting so for optimal success, I’d push each 8’-12” cutting ¾ into the potting mix.
After they are all stuck in the potting mix, water the whole thing well to close gaps between the cuttings and the potting mix and to ensure the mix is well moistened. Let it drain for a minute, then get a white plastic trash bag, not black or clear or anything else, white. This will allow enough light through to keep them alive but not let it heat up too much.
Tie the bag off lightly and suspend the bag above the pot or bucket so it doesn’t droop down and touch the cuttings, make it look like a teepee.
Place that whole setup in dappled shade. Direct sunlight will kill the plants, and full shade will promote rot, you want some dappled light to hit it for at least 2-4 hours of the day.
They should root in a few weeks to a month, as soon as they start putting on new growth that’s more than an inch, open the bag and check daily but leave them in the dappled light. Then after they are growing and rooted well, you can submerge the whole bucket or pot in a bucket of water to turn the potting mix into a slurry so you can remove the cuttings without damaging the roots.
For method two, you prep the cuttings the exact same way, but this time make sure you have an air pump pushing air through an airstone in the bottom of a jar filled with water. I just use quart jars. Then all you have to do is keep the water topped off in the jar. The jar of oxygenated water is far simpler, but requires more frequent maintenance because you cannot let them dry out. The pot in a bag method is initially slightly more complicated and is pretty much set and forget. You can forgo the air stone if you can’t afford it, but for $12 or so you can get an air pump and airstone, and oxygenating it will really help them make more roots and quicker.
Alrighty, that about wraps up my answer, and again, if that was at all confusing or you would rather see what I’m talking about, head over to patreon.com/homegrownliberty and sign up as a supporter with as little as a dollar per month to get access to videos and support my work!
Here are some affiliate links for appropriate products if you want to order them via Amazon quickly and easily
This link is to a double outlet air pump with the airlines and two air stones. You could run two containers of cuttings with method #2. This is the cheap option. Air Pump Kit
For a much better air pump that you can use for other projects like compost tea, aquaponics, hydroponics, or to run multiple propagation vats, here’s a Commercial Air Pump
No comments yet.